MediaPipe:是Google开发的适用于直播和流媒体的开源、跨平台、可定制的机器学习解决方案。code地址:https://github.com/google/mediapipe ,最新发布版本v0.10.11,license为Apache-2.0。MediaPipe Solutions提供了一套库和工具,供你在应用程序中快速应用人工智能(AI)和机器学习(ML)技术,包括:目标检测、图像分类、图像分割、人脸检测等。
MiDaS:开源的单目深度估计实现,地址:https://github.com/isl-org/MiDaS ,license为MIT。
通过Anaconda搭建开发环境,依次执行如下命令:
conda create -n MediaPipe python=3.9
conda activate MediaPipe
pip install mediapipe
pip install requests
git clone https://github.com/fengbingchun/NN_Test
cd NN_Test/demo/Python
以下为测试代码:
import sys
import os
import cv2
import requests
import mediapipe as mp

def download_onnx_model(url, model_name):
	if os.path.exists(model_name) and os.path.isfile(model_name):
		return

	response = requests.get(url, stream=True)
	if response.status_code == 200:
		print("Downloading ... ...")
		with open(model_name, "wb") as f:
			for chunk in response.iter_content(chunk_size=8192):
				if chunk:
					f.write(chunk)
		print("file downloaded successfully:", model_name)
	else:
		raise Exception("Error: unable to download file: {}".format(model_name))

def get_images(dir, img_suffix):
	#print("dir:{}, img suffix:{}".format(dir, img_suffix))
	imgs = []

	for img in os.listdir(dir):
		if img.endswith(img_suffix):
			imgs.append(dir+"/"+img)

	return imgs

def depth_to_distance(depth) -> float:
    return -1.5 * depth + 2

def calc_distance(imgs, model_name):
	for img in imgs:
		bgr = cv2.imread(img, 1)
		if bgr is None:
			print("Error: image {} can't be read".format(bgr))
			continue

		rgb = cv2.cvtColor(bgr, cv2.COLOR_BGR2RGB)
		height, width, channels = rgb.shape

		# define mediapipe face detection model
		face_detection_model = mp.solutions.face_detection.FaceDetection(min_detection_confidence=0.5, model_selection=0)

		# load monocular depth estimation model
		mono_model = cv2.dnn.readNet(model_name)

		# detect faces
		face_results = face_detection_model.process(rgb)
		if face_results.detections:
			for face in face_results.detections:
				# draw bounding boxes around the detected faces
				mp.solutions.drawing_utils.draw_detection(rgb, face)
				# in 0-1 scale
				boundary_box = face.location_data.relative_bounding_box
				# scale up to the image size
				boundary_box_scaled = int(boundary_box.xmin * width), int(boundary_box.ymin * height), int(boundary_box.width * width), int(boundary_box.height * height)
				# display the face detection score
				cv2.putText(rgb, f'{int(face.score[0]*100)}%', (boundary_box_scaled[0], boundary_box_scaled[1] - 20), cv2.FONT_HERSHEY_SIMPLEX, 2, (0,255,0), 2)

				# interest point of depth in a face. The center will be measured.
				interest_point = (boundary_box_scaled[0] + boundary_box_scaled[2] / 2, boundary_box_scaled[1] + boundary_box_scaled[3] / 2)

			# MiDaS v2.1 Small (Scale: 1/255, Size: 256x256, Mean Subtraction: (123.675, 116.28, 103.53), Channels Order: RGB,swapRB=True, crop=False)
			blob = cv2.dnn.blobFromImage(rgb, 1/255., (256,256), (123.675, 116.28, 103.53), True, False)

			# set the input into the model
			mono_model.setInput(blob)

			# get depth map
			depth_map = mono_model.forward()

			# resize it to the real world
			depth_map = depth_map[0,:,:]
			depth_map = cv2.resize(depth_map, (width, height))
			depth_map = cv2.normalize(depth_map, None, 0, 1, norm_type=cv2.NORM_MINMAX, dtype=cv2.CV_32F)

			# change colors to display it in OpenCV
			bgr = cv2.cvtColor(rgb, cv2.COLOR_RGB2BGR)

			# get the depth of the point of interest
			depth = depth_map[int(interest_point[0]), int(interest_point[1])]

			depth_distance = depth_to_distance(depth)
			cv2.putText(bgr, f"Depth to face: {str(round(depth_distance,2)*100)} cm", (40,600), cv2.FONT_HERSHEY_SIMPLEX, 2, (0,0,255), 2)
			cv2.imwrite("../../data/result_"+os.path.basename(img), bgr)

if __name__ == "__main__":
	if len(sys.argv) != 3:
		raise Exception("Usage: requires two parameters, for example: python {} directory_name image_suffix_name".format(sys.argv[0]))

	model_name = "model-small.onnx"
	download_onnx_model("https://github.com/isl-org/MiDaS/releases/download/v2_1/model-small.onnx", model_name)

	imgs = get_images(sys.argv[1], sys.argv[2])
	#print("imgs:", imgs)

	calc_distance(imgs, model_name)

print("test finish")说明:
1.测试代码参考:https://levelup.gitconnected.com
2.mp.solutions.face_detection.FaceDetection函数中,model_selection默认为0;距离相机2米以内的脸部检测模型设置为0,即short_range;距离相机5米以内的脸部检测模型设置为1,即full_range。
3.model-small.onnx为预训练的单目深度估计模型,从https://github.com/isl-org/MiDaS/releases/tag/v2_1 下载;如果有cuda,也可以使用更大的模型获得更真实的结果。
4.depth_to_distance函数用于将深度图值转换为以厘米为单位的真实世界的距离,此转换的公式根据你的网络摄像头配置而有所不同。注:还不清楚此公式怎么来的
5.测试代码接收2个参数,第一个参数指定存放图像的路径,第二个参数指定图像后缀名;首次运行会自动下载onnx模型。
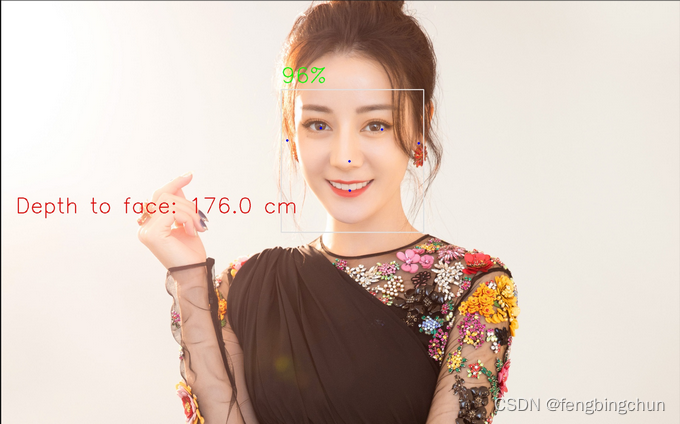
运行结果如下图所示:

测试图像执行结果如下图所示:原始图像来自于网络
GitHub:https://github.com/fengbingchun/NN_Test